How To Adjust Skin Tone In Lightroom Mobile
To start things off lets walk through the most simple way of creating a tan in Lightroom. If you hold down the left mouse button and drag the double-pointer icon right and left you change the settings for the selected control region.
How To Adjust Skin Tones In Lightroom Mobile Easily Ienjoyediting Ienjoyediting
You can then use the temperature slider to adjust the tone further if it remains too warm or too cool.
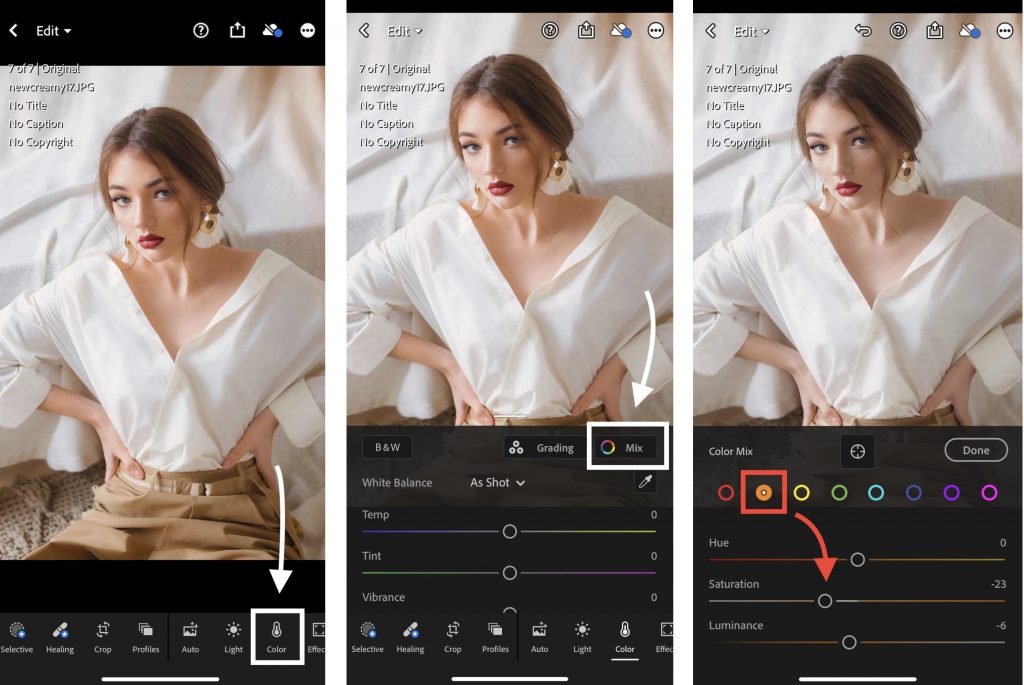
How to adjust skin tone in lightroom mobile. From there youll click the Orange Circle. Step 2 Determine the main tone of your skin. Click on it looks like a dropper then click on any white area of your photo.
To correct skin tones this way select the targeted adjustment tool in this panel and click and drag UPWARD over the skin tones to brighten those tones. Edit Skin Tones Using Tone Curves. To get to the orange bar on the free Lightroom mobile app youll click the Color tab which is located in the bottom menu where you see the crop light presets etc tabs.
Theres a reason its called the White Balance. 505 What happens in front of the camera with your subjects location and light matter MORE than what preset you use for post. Then do the same thing in the shadows clicking on the curve and dragging down.
Adjust the skin tones in Lightroom Mobile takes only 1. USING THE LIGHTROOM APP Using the Lightroom app allows you to edit the look of your photos in one place and gives you options to make smart adjustments on your photo. Tone curves are one of the quickest ways to edit skin tone in Lightroom.
In Lightroom you can correct your white balance fairly quickly using the adjustment tool. The area for each Tone control appears in light gray along with the name of the control and current setting. 2 Measure skin tones in the middle range of brightness.
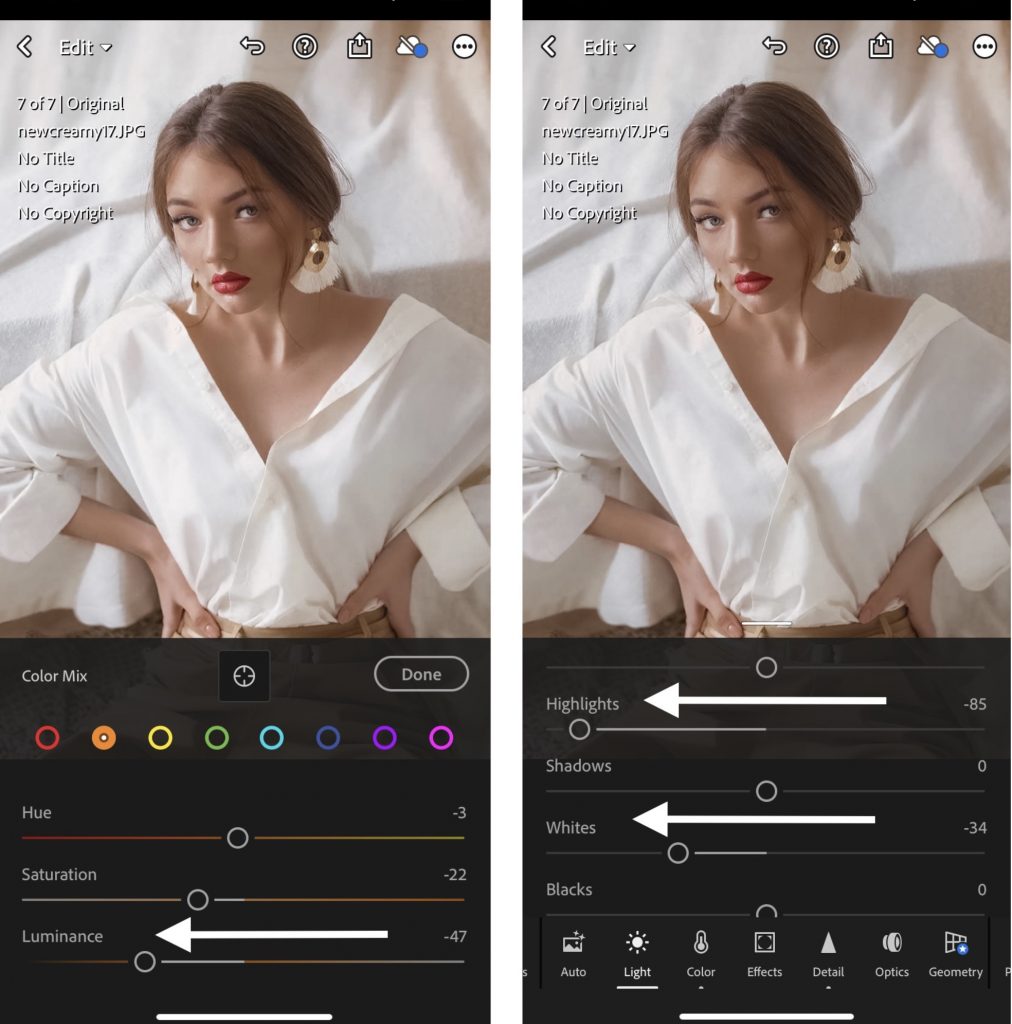
For many people they arent the most intuitive thing to use but they can be really helpful. If adjustments need to be made to the skin tone I highly recommend adjusting the orange luminance and the orange saturation sliders ever so slightly. In the rare event that the presets sightly alter your skin tone youll want to adjust the orange bar.
The last step is to correct skin tones that are too orange. Also avoid measuring on cheeks the end of the nose or other areas that are usually redder than others. Maintaining your style and much more.
Todays tutorial is all about how to colour correct skintones in Lightroom. Open the tone curve panel from the right side of the screen and set the channel to whatever needs to be adjusted the red green or blue value. Once opened click in the highlights and drag down slightly to darken.
There are some tricks you need to know to use the app and enjoy the result of presets smoothly and that is what I will show you today. Youll likely need to work with the dropper the slider and even the tint to find the correct skin tone. Keep in mind that each photo is different in terms of how much you should move the sliders to get your desired result a more natural looking skin tone.
Once you click color you will click the Color Wheel Icon next to Mix. The solution is raising the red and orange hue sliders and lower the red and orange saturation sliders. CHECK THE LIGHT TOOL Inside your Light tool you will find multiple adjustment that will drastically correct the aspect of your skin.
Ive had quite a few requests for portrait retouchingediting tutor. With the HSL sliders with global white balance changes and with the adjustment brush. The lower - the orange.
3 In general when Im editing photos I look for tones in these ranges. The key factors of good skin tone. Next increase the saturation of the orange and yellow hue sliders to enhance the tan color.
You may find that the presets work perfectly or you may find that the skin. Sometimes you might also need to adjust the tint as well. Skin Tone Color Adjustments.
Temp Tint sliders in Lightroom. Another option for adjusting your skin tones is to use the Luminance section of the HSL Panel. The Luminance sliders adjust the brightness or darkness of colors in Lightroom.
To finalize the effect adjust the orange Luminance value to make the tan look lighter or darker. For this tutorial I went with my new preset Portrait 2 this way only subtle changes are made and we can focus on adapting the colour of my skin. Those 3 options are all pretty easy to use and they will take care of most of the skin tone issues that you will face.
So there you have 3 ways to fix skin tones in Lightroom. To see what image data each Tone control affects hover your mouse pointer over the Histogram and move it right and left. The orange bar is where skin tones fall.
Look for mid-tones rather than bright highlights or deep shadows. To access the Tone Curve in Lightroom Mobile look for the Curve button at the top of the Light adjustment. More specifically click and drag upward over areas where you are.
Skin tones in the golden hour. To make your skin look tan in Lightroom go to the HSL panel and decrease the orange and yellow hue value. Jun 7 2020 - Our presets are created for all skin tones.
When you have the right color curve open click on the Targeted Adjustment. The Key Factors of skin tone. Choosing the best preset for the skin tone.
After thats been done raise the Luminance sliders to correct the color brightness. How to Adjust Skin Tones in Lightroom Mobile. Step 1 Import your photo in Lightroom and apply a preset.
How To Adjust Skin Tones In Lightroom Mobile Easily Ienjoyediting Ienjoyediting

How To Correct Orange Skin Tones In Lightroom Mobile Pixgrade
Belum ada Komentar untuk "How To Adjust Skin Tone In Lightroom Mobile"
Posting Komentar